TL;DR
Moving your rig into a closet or small space with the right treatment drastically cuts noise and echo. Effective placement, sealing gaps, and managing heat are key for a quiet, professional-sounding setup.
Ever notice how your closet sounds like a mini echo chamber? It’s not just in your head. Small, heavily absorptive spaces like closets can be goldmines for voice and music recordings. But they’re not magic—understanding how to dampen sound, position your gear, and manage heat transforms a noisy closet into a quiet sanctuary.
This isn’t about throwing up foam panels and hoping for the best. It’s about strategic placement, sealing leaks, and controlling heat. Whether you’re recording vocals, streaming, or just need a quieter workspace, this guide reveals what really makes a closet work as a sound studio.
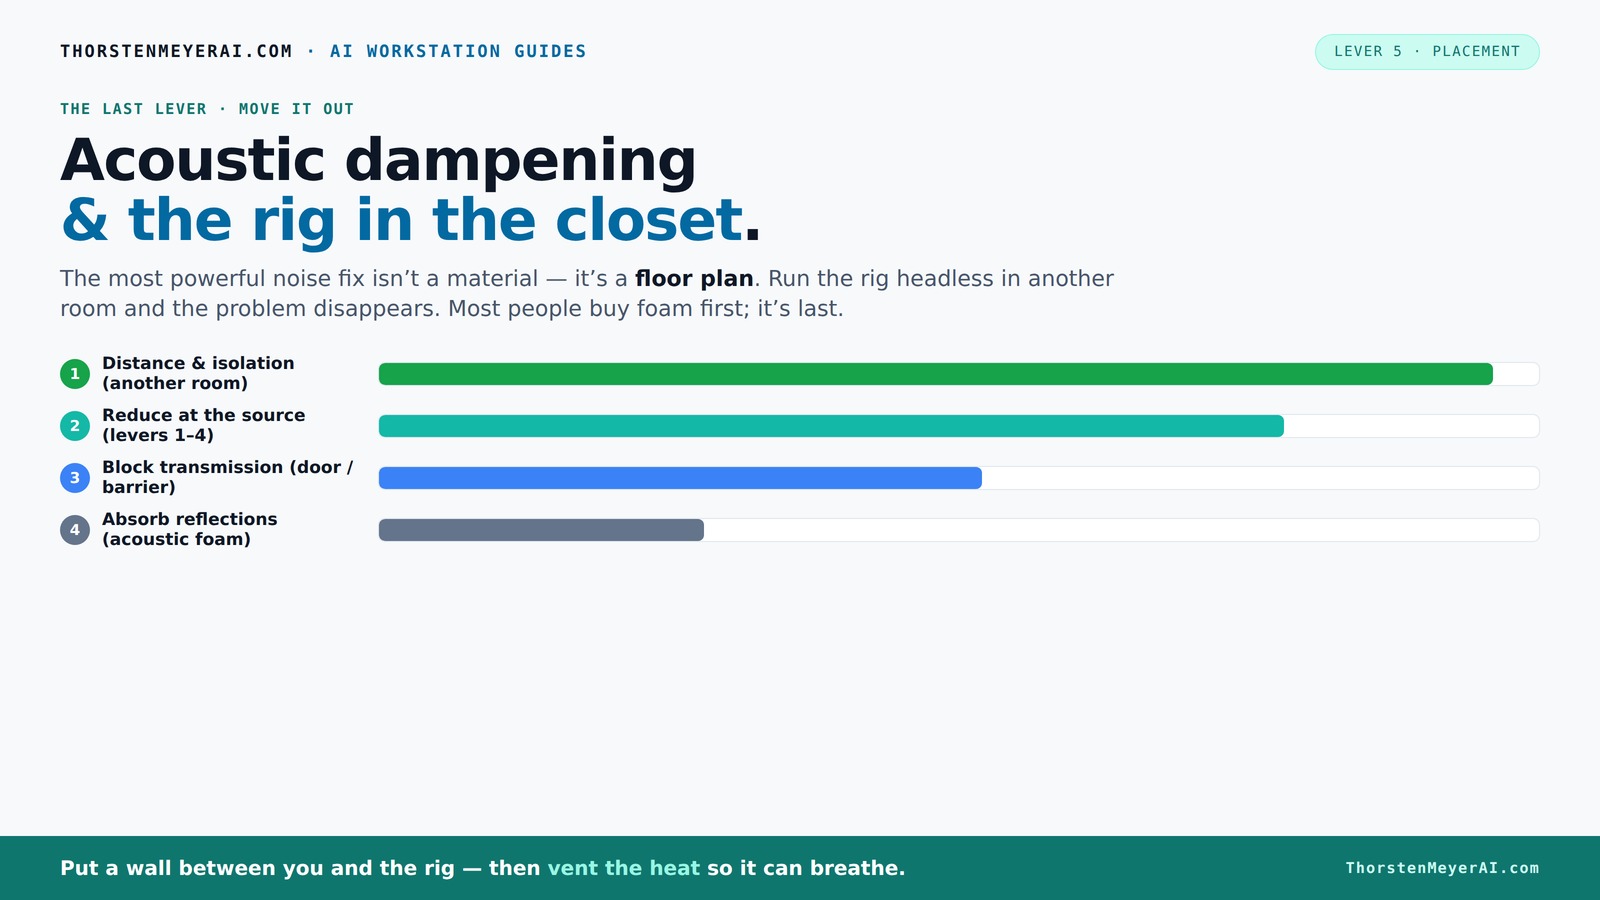
Acoustic dampening
& the rig in the closet.
The most powerful noise fix isn’t a material — it’s a floor plan. A rig you can’t hear because it’s in another room beats any amount of foam. Tap the approaches in Part 1 to see what actually works.
(another room)
(levers 1–4)
(door / barrier)
(acoustic foam)
Contain the noise, not the heat
Key Takeaways
- Prioritize distance and isolation over absorption—moving the rig away from your workspace is the most effective noise reducer.
- Heavy, layered materials like blankets and dense foam panels dramatically cut reflections and echo, especially when placed at reflection points.
- Seal gaps around the door and use acoustic treatments at the reflection points for the best sound quality.
- Manage low frequencies with bass traps in corners to prevent boomy sound and standing waves.
- Always include proper ventilation—passive vents or quiet exhaust fans—to prevent heat buildup and maintain comfort.
soundproof closet acoustic panels
As an affiliate, we earn on qualifying purchases.
As an affiliate, we earn on qualifying purchases.
Why a Closet Can Be Your Best Recording Spot (And What It’s Not)
A closet is a surprisingly good spot because it naturally minimizes echo and reflections. Its small size and soft materials—clothes, blankets—absorb sound, making voice recordings clearer and more focused. Think of it like a tiny, cozy vocal booth.
But don’t mistake it for a soundproof room. It won’t block out all external noise. That’s where the common misconception kicks in. Your closet mainly reduces internal reflections, not outside noise leaks. Still, it’s a win for clarity and focus, especially when you want to keep your voice crisp.
For example, a voice-over artist found that recording in her closet cut her room reverb by 80% and made editing much easier. The closet became her secret weapon for clean, professional-sounding recordings.
studio foam sound absorption
As an affiliate, we earn on qualifying purchases.
As an affiliate, we earn on qualifying purchases.
The Magic of Acoustic Dampening: What Materials Work Best
Acoustic dampening is about soaking up sound waves before they bounce around. Heavier, dense materials like moving blankets, acoustic panels, and thick foam do a better job than thin foam squares. For example, layering multiple blankets can cut echo by 50% more than a single foam panel.
Think of your closet walls as a rough canvas. Covering hard surfaces, especially the door and ceiling, with dense materials prevents sound from bouncing back. Rugs and pillows help absorb mid and high frequencies, creating a smoother sound.
For a practical DIY approach, you can line the closet with a combination of dense blankets, foam panels, and even thick rugs. This layered coverage dramatically reduces reflections and makes your recordings sound more professional.
It’s important to note that the choice of materials involves tradeoffs. Heavier, denser materials are more effective but also bulkier and more expensive. Balancing effectiveness with practicality is key. Overdoing it can also lead to a cramped space, which might affect comfort and heat management. The goal is to find a middle ground that maximizes absorption without sacrificing usability.
door seal soundproofing kit
As an affiliate, we earn on qualifying purchases.
As an affiliate, we earn on qualifying purchases.
Where to Place Sound Treatment for Maximum Effect
Placement is everything. Start by locating the main reflection points—usually the wall directly in front of where you speak or sing, the ceiling overhead, and the side walls near your mic. These are the spots where sound bounces back into the mic, creating echo and muddiness.
Next, focus on the door and corners. The door is a major leak point—seal it with weatherstripping or heavy blankets. Corners trap bass and low frequencies, so adding bass traps or dense panels there can tame low-end buildup.
Understanding why these spots matter is crucial. Reflection points are where sound reflections cause reverberation, muddiness, and loss of clarity. Properly treating these areas ensures a cleaner, more accurate recording. Sealing gaps prevents external noise intrusion, which can otherwise ruin your recordings. Bass traps in corners prevent low-frequency buildup that causes boomy or muddy sounds, especially in small spaces where these issues are magnified.
For example, a podcaster placed foam at reflection points, sealed her door with a heavy blanket, and added corner bass traps. The result? A studio-quality sound in her tiny closet. Recognizing the importance of these strategic placements makes a noticeable difference in your final sound quality.
portable vocal booth for small spaces
As an affiliate, we earn on qualifying purchases.
As an affiliate, we earn on qualifying purchases.
How to Seal the Door and Gaps for Better Isolation
The door is often the weak link in sound isolation. You can significantly reduce noise leaks by sealing gaps with weatherstripping, door sweeps, or mounting blankets over it. For example, a simple draft stopper under the door can cut outside noise by 30%.
Use acoustic sealant around the door frame and add a dense curtain or blanket to cover the entire door. This creates a barrier that prevents sound from sneaking out or in.
Sealing gaps isn’t just about reducing noise; it also improves the overall acoustic environment inside the closet. When outside noise leaks in, it can interfere with your recordings, causing unwanted background sounds. Conversely, leaks allow your sound to escape, disturbing others or reducing privacy. The tradeoff here is that sealing can make the space feel more enclosed or claustrophobic, so balance sealing with comfort. Properly sealed, your closet can become a more controlled environment, producing clearer recordings and less external disturbance.
In a real-world case, a streamer sealed her closet door with weatherstripping and a thick curtain. Her neighbors stopped hearing her late-night vocals, even without full soundproofing. This demonstrates how effective sealing can be for practical, everyday use.
Managing Low Frequencies and Standing Waves in Tiny Spaces
Small closets tend to build up bass and create standing waves—resonances that make some notes sound boomy or muddy. To tame this, add bass traps or foam in the corners where low frequencies tend to concentrate.
For example, a musician placed dense foam blocks in the closet corners, which flattened the bass response and made his recordings clearer. These low-end treatments are crucial if your closet is larger or has parallel walls that reflect low frequencies.
Understanding why this matters is essential. Low frequencies are harder to absorb and tend to bounce around, creating resonance issues that color your recordings. If left untreated, these resonances make your sound muddy and unbalanced. Using bass traps in strategic locations reduces these problematic resonances, resulting in a more accurate and professional sound. Remember, the size of your closet influences how much bass trapping is needed—larger spaces may require more extensive treatment. The tradeoff involves space and cost, so prioritize corners and reflection points first for the most noticeable improvements.
Keeping Your Closet Cool and Usable — The Ventilation Trick
Hot, stuffy closets are no joke—especially during long recording sessions. The key is good airflow. Passive vents help, but better is a quiet exhaust fan that pulls hot air out and brings in cool air.
For example, a voice actor installed a small, quiet computer fan with ducting to vent her closet. The temperature stayed stable, and her recordings stayed crisp without fans roaring in the background.
Proper ventilation isn’t just about comfort; it directly impacts your equipment’s lifespan and your ability to record uninterrupted. Overheating can cause microphones and computers to malfunction or degrade in quality. Engineered soundproof cabinets with built-in ventilation are ideal, but even simple solutions like ducted fans or passive vents can make a significant difference. The tradeoff is noise: some ventilation methods can introduce noise if not chosen carefully. Selecting quiet, low-vibration fans and strategically placing vents ensures you maintain a cool, functional space without compromising sound quality.
Putting It All Together: DIY Tips for a Quiet, Comfortable Closet Studio
Combine these strategies for best results. Cover reflection points with dense foam or blankets, seal gaps around the door, add bass traps in corners, and set up a quiet ventilation system. The goal is to create a space that’s dampened, sealed, and cool.
For example, a beginner streamer layered thick blankets on walls, sealed her door with weatherstripping, added corner bass traps, and installed a small exhaust fan. Her sound improved dramatically, and she could record for hours without overheating.
Remember, the more coverage and proper placement, the better the sound. Don’t be afraid to experiment with materials and positioning. Every closet is different, and small tweaks make big differences. The key is understanding the purpose behind each step—absorption, sealing, bass management, and cooling—and how they work together to create an optimal environment.
Frequently Asked Questions
Is acoustic foam enough for a closet studio?
Acoustic foam helps reduce echo and reflections inside the closet, but alone it doesn’t block outside noise. For best results, combine foam with sealing gaps and placing it at reflection points.
Where should I place panels or blankets in my closet?
Focus on reflection points—walls directly in front of you, ceilings, and side walls near your mic. Cover these areas first for maximum reduction of echo and reverb.
How do I stop sound from leaking through the door?
Seal gaps with weatherstripping or door sweeps. Using heavy blankets or acoustic curtains over the door can also cut down on leaks significantly.
Do bass traps help in a closet this small?
Yes. Bass traps in corners help tame low-frequency buildup and standing waves, making your recordings sound cleaner and more balanced.
Can I make a closet booth sound professional on a budget?
Absolutely. Layering thick blankets, sealing gaps, and adding simple DIY bass traps can dramatically improve sound quality without breaking the bank.
Conclusion
Turning your closet into a quiet, professional-grade studio isn’t about magic; it’s about strategic choices. The simplest, most effective fix is moving your rig into a space where noise won’t bother you. Then, layer on sound treatment, seal gaps, and keep it cool.
Think of your closet as a blank canvas—add the right materials, place them carefully, and it transforms into a powerful recording space. Your voice, music, or work will sound clearer, richer, and way more professional.